
A Casual Lunch with Vintage Bamboo, Tortoise Shell, and a Touch of Fun
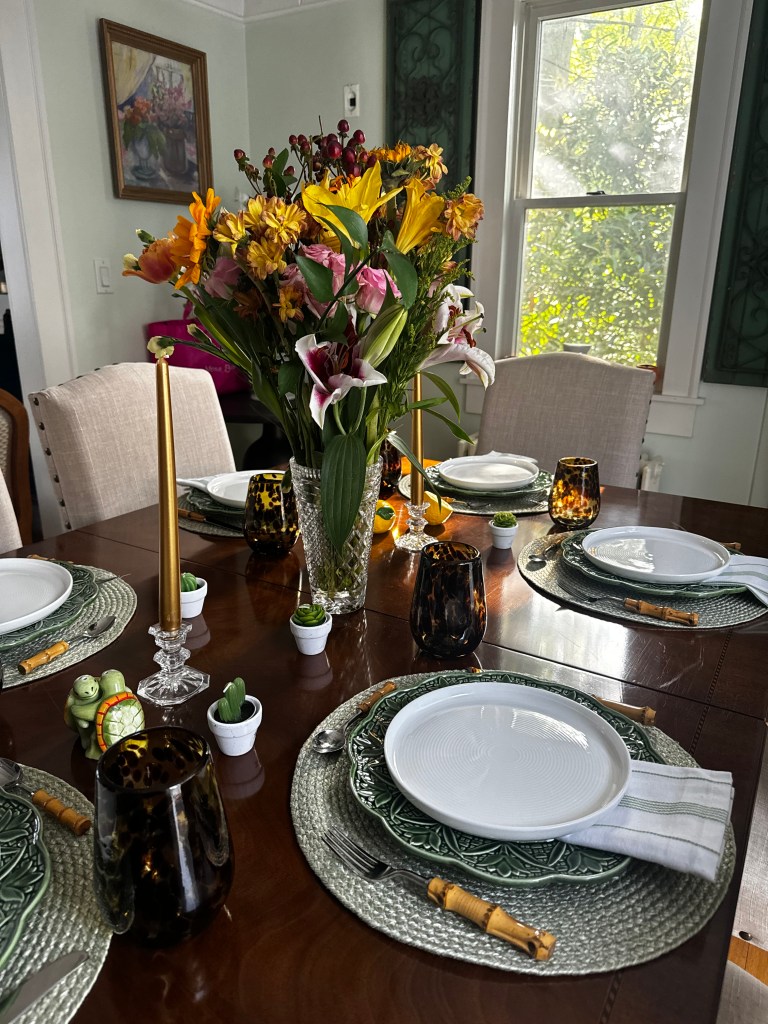
Nothing says spring and summer lunch quite like a classic green tablescape paired with bamboo and tortoiseshell accents—don’t forget the themed salt and pepper shakers!
When I set the table for a casual lunch, I love using bamboo flatware during the warmer months because it brings a touch of nature to the table. The set I’m using here is a vintage collection of Sato Shoji flatware. Bamboo flatware, in general, has been gaining popularity for its sustainability and eco-friendly properties. As a renewable resource, bamboo is often marketed as an environmentally conscious alternative to plastic or metal flatware, especially for those looking to reduce their environmental impact.
To complement the bamboo flatware, I like incorporating tortoise shell cups and small table-setting accents that add warmth and a touch of vintage charm. The rich, amber tones of tortoise shell pair beautifully with the natural texture of bamboo, creating a layered, organic look that feels both curated and effortless. These elements work especially well for al fresco dining or a relaxed indoor lunch, where the goal is casual elegance. The subtle shine of the tortoise shell cups contrasts nicely with the matte finish of the bamboo, offering visual interest without overpowering the table. Together, they evoke a sense of timeless, natural style that’s perfect for laid-back gatherings.
Since our main focus is on the accents, you can mix and match the place settings depending on what you have on hand!
To add a bit of personality and charm to the table, I love including whimsical accents like turtle-shaped salt and pepper shakers or ceramic lemon-shaped ones for a pop of color. These small touches keep the setting lighthearted and invite conversation. For centerpieces, I often reach for simple arrangements—like a bowl of fresh citrus, small potted herbs, or any type of arrangement, you can never go wrong with some flowers. These little details not only complete the look but also make the table feel inviting and uniquely yours.
A Full Meal Featuring Grilled Chicken and Seasonal Sides
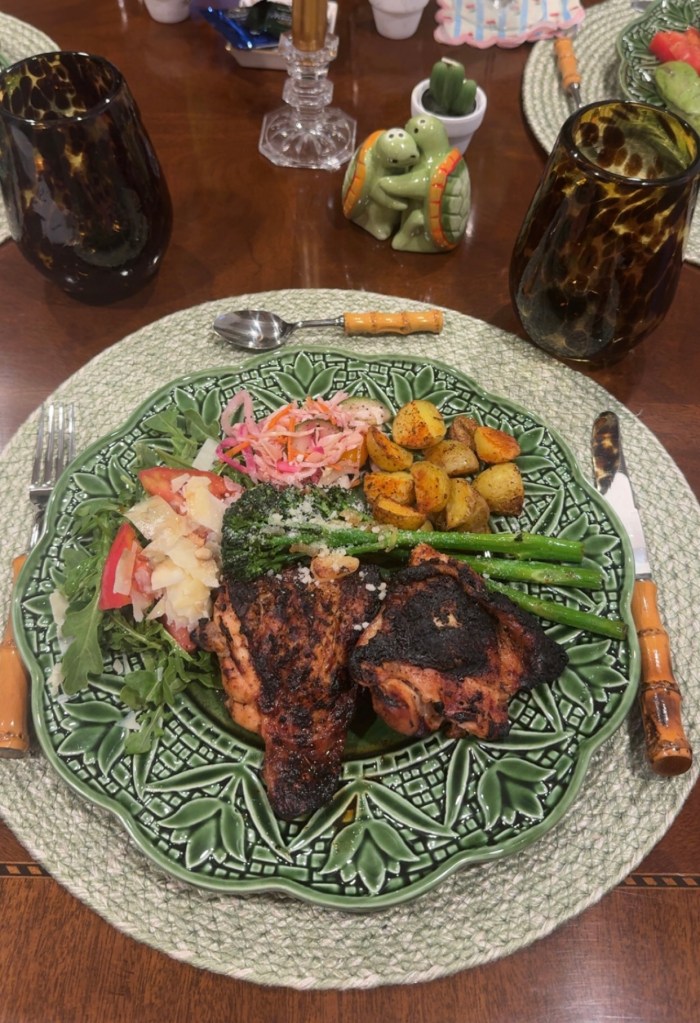
For this flavorful grilled chicken thighs recipe, I start by marinating the meat overnight in a zesty blend of red wine vinegar, Worcestershire sauce, salt, black pepper, garlic powder, paprika, oregano, fresh lemon juice, and a touch of olive oil. The long marination time allows the flavors to deeply penetrate the chicken, making it juicy and aromatic. When ready to cook, I grill the thighs on both sides until they’re nicely charred, locking in that smoky, savory goodness. To ensure they’re perfectly cooked and safe to eat, I check that the internal temperature reaches 165°F (74°C), which is the optimal doneness for chicken thighs.
To complement the grilled chicken, I make a simple yet tangy cabbage coleslaw salad. I use a fresh coleslaw mix as the base and marinate it in a light dressing of red wine vinegar, lemon juice, salt, pepper, and garlic powder. Thin slivers of red onion add a sharp bite and extra crunch, balancing the acidity of the marinade. I let the salad sit in the fridge overnight, which allows the flavors to meld and the cabbage to soften slightly while still retaining its crisp texture. It’s a refreshing, vibrant side that pairs perfectly with the smoky richness of the grilled chicken.
For the roasted potatoes, I like to use a small medley variety—they’re naturally bite-sized, cook evenly, and don’t require much prep. Before roasting, I toss them with olive oil, paprika, salt, pepper, and garlic powder to give them a rich, savory coating. I roast them at 400°F for about 40 minutes, which gives them a golden exterior and tender center. For those who love extra crispy potatoes, a great trick is to soak them in water for an hour or two beforehand to remove some of the excess starch—this helps them crisp up beautifully in the oven. Just be sure to pat them dry and give them an extra 5–10 minutes of roasting time for that perfect crunch.
To finish, I season the broccolini with salt and pepper, then sear it in a hot pan for 2–3 minutes on each side until nicely charred. I remove it from the pan, melt a bit of butter, then return the broccolini to the pan and cook for another 3–5 minutes to soften. Finally, I toss it with finely grated Parmesan cheese before serving.

Leave a comment